How do I Setup a fixed IP on OpenELEC on my Raspberry Pi?
Setting up a Fixed IP address on OpenELEC on your Raspberry Pi is actually fairly straight forward, but you will need to get some information before we start.
- You will need your Subnet Mask.
- The IP address of you router.
- The IP address of your ISP’s DNS servers.
- The IP range of your router / Access points DHCP server.

How to get the above information.
There are a few ways to get this information, but the simplest is either via logging into your router and getting the information or from your installation of OpenELEC before you setup a fixed IP.
Via OpenELEC
- The below assumes you are connecting to your router correctly via DHCP e.g. everything works.
- Navigate to SYSTEM > Sytem Info.
- Move down the menu to Network and note the following items
- IP address:
- Subnet Mask:
- Gateway:
- The DHCP range and DNS servers will still need to be sourced from your router.
Via your Router
The actual method will depend on your router, but generally speaking once you have logged into your router you will need to find the status tab. This should give you the information you need.
DNS Servers
Within the routers status tab you should see DNS 1 & DNS 2 labels with IP addresses next to them (see sample below) these are the DNS servers you will need for setting up the fixed IP Address.

DHCP range
Again the actual place to find this will depend on your router but generally you will find the DHCP settings under basic setup or network settings.
On the right is the DHCP setup section on a linksys router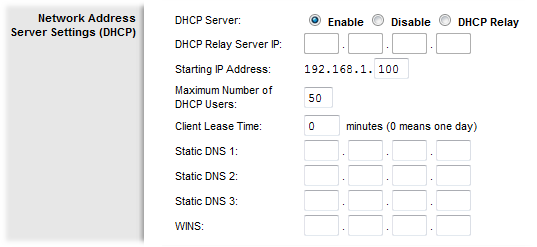 . the Starting IP Address is 192.168.1.100 and the max number of users is 50 that means the DHCP range is between 192.168.1.100 and 192.168.1.150.
So any Fixed IP addresses will need to be higher or lower than that range, I would suggest using the IP’s between 192.168.1.49 and 192.168.1.99 for equipment requiring a fixed IP address.
Setup Fixed IP
- Navigate to SYSTEM > OpenELEC.
- If you want to setup a fixed IP for the build-in network socket on your PI select Network 1.
- If you want to setup a fixed IP for a secondary network interface i.e. a wireless dongle select Network 2.
- For instructions on setting up Wifi see our recent post here.
- In the selected Network tab,
- Move down to Static IP address and press enter
- now enter the information you got earlier.
- Enter the Fixed IP address you would like the PI to use.
- This should be outside of your Router / Access Points DHCP range.
- Enter the Subnet mask
- Enter the Gateway IP – this will be the IP address of your router.
- Enter the DNS server 1
- Enter the DNS server 2
- Enter the Fixed IP address you would like the PI to use.
- Click Save.
- Reboot your pi.
- Go into SYSTEM > System Info > Network and check that the PI has connected to your router / access point and is connected to the internet.
- Thats it …….
If it does not work check you setting and make sure you have rebooted your machine, if it still does not work you may need to use an external USB powered hub as your WiFi dongle may require more power than the Pi’s USB ports can supply.
If you would like help with your Raspberry PI, computer or laptop then please contact us or visit our IT Support Page.